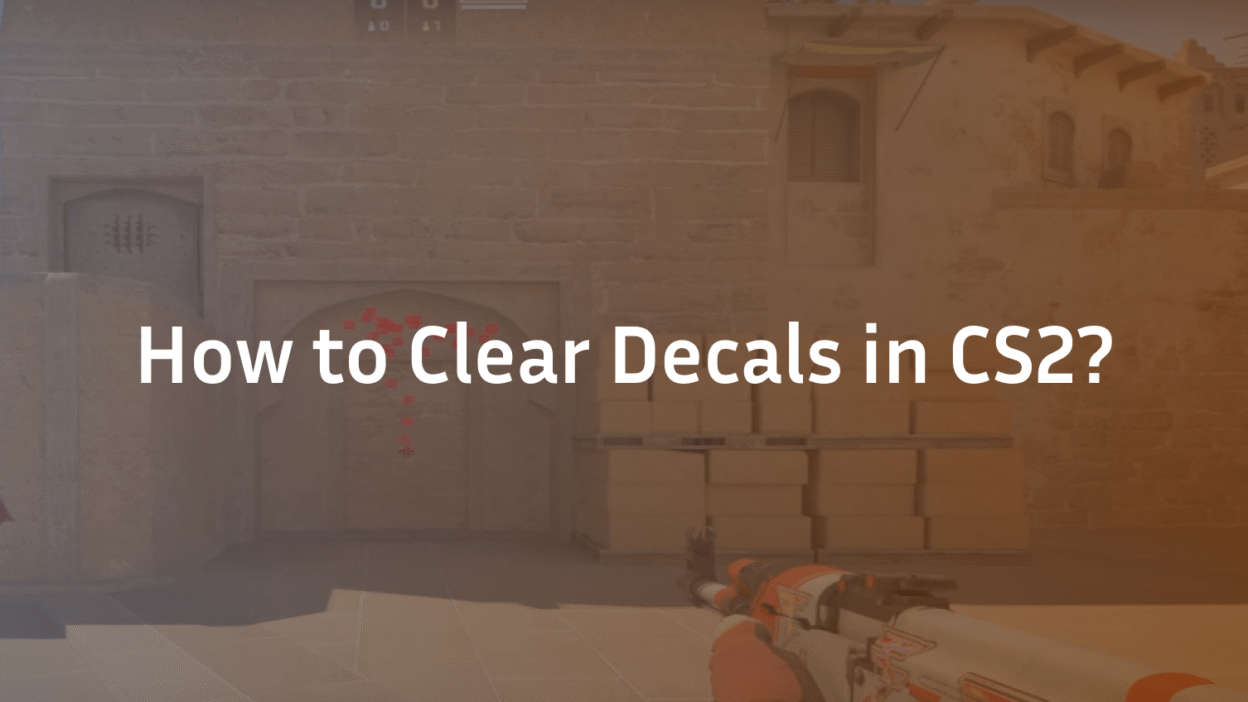
How to Clear Decals in Counter-Strike 2 Using a Console Bind
If you’re serious about competitive play in Counter-Strike 2, you know that every frame and every pixel matters. Lingering blood splatters, bullet holes, and grenade scars—collectively known as decals—can not only subtly clutter your visual field but also impact game performance over time. Manually clearing them is impossible in the heat of a round, which is why the smartest players use a simple console bind to handle it automatically.
This expert guide will teach you exactly how to create and implement a decal-clear bind, turning a minor technical trick into a tangible gameplay advantage. This is the same kind of performance optimization that pros prioritize, much like dialing in their perfect s1mple CS2 settings or m0NESY CS2 settings.
What Are Decals in CS2 and Why Do They Matter?
Before we dive into the solution, it’s crucial to understand the problem. Decals are the dynamic environmental textures that appear after in-game events. Every time a bullet hits a wall, a grenade explodes, or a player is eliminated, CS2 renders a decal to mark the spot.
While these effects add to the game’s realism, they have two significant drawbacks for competitive players:
- Visual Clutter: Over the course of a round, especially on contested choke points like Mirage’s A Site, these decals can accumulate, creating visual noise that might obscure an enemy’s shoulder or head.
- Potential Performance Impact: On lower-end systems or in intensely chaotic moments, the game’s engine tracking and rendering dozens of decals can contribute to frame rate stutters. Clearing them frees up resources.
The Superior Solution: Automating Decal Clearing with a Bind
The console command r_cleardecals exists to remove these textures. However, typing it manually into the console each time you need clarity is utterly impractical. The professional solution is to bind this command to a key press, allowing you to refresh your visual environment instantly and without breaking your flow.
This is a fundamental part of a clean config, similar to how pros optimize every other aspect of their game, from their ZywOo CS2 settings to their device CS2 settings.
Step-by-Step: How to Create Your Decal Clear Bind
Follow these steps precisely to implement your new bind. The entire process takes less than a minute.
Step 1: Enable the Developer Console
This is the gateway to advanced CS2 customization. If you haven’t already enabled it, here’s how:
- Launch CS2 and open Settings.
- Navigate to the Game tab.
- Find “Enable Developer Console (~)” and set it to Yes.
Step 2: Choose Your Bind Key
You need to select a key that is easily accessible but won’t interfere with core gameplay. Common choices include:
- F key (A common interact key, but can be doubled up)
- C or V (Easy to press with your thumb)
- MOUSE4 or MOUSE5 (Side mouse buttons, excellent for binds)
Step 3: Execute the Bind Command
Now, open the console with the ~ key and enter one of the following commands, replacing KEY with your chosen key.
For a permanent bind (lasts until you change it):
bind “KEY” “r_cleardecals”
Example: bind “f” “r_cleardecals”
For a bind that also performs another action (e.g., reloading):
bind “r” “+reload; r_cleardecals”
This command will clear decals every single time you press R to reload, keeping your screen consistently clean.
Advanced Binding Strategies and Execution
Once you’ve mastered the basic bind, you can explore more sophisticated configurations. Many advanced players use a combination of utility binds to maximize efficiency, a level of customization often seen in detailed ropz CS2 settings guides.
A highly effective advanced technique is to combine your decal clear with a commonly spammed action. For instance, binding it to your jump key:
bind “space” “+jump; r_cleardecals”
Since you often jump around corners or spam jump to peek, this passively clears decals as you move through the map. The key is to make the action subconscious and automatic.
Troubleshooting: Common Bind Issues and Fixes
What if your bind doesn’t work? Don’t worry. Here are the most common issues and their solutions:
- “Unknown command” error: Ensure you are typing r_cleardecals correctly. It is a single word.
- Bind doesn’t save after restart: To make your binds permanent, you need to add them to your autoexec.cfg file. This is a text file placed in your CS2 config directory that runs every time the game launches.
- Conflicting binds: If you bind a key to a new command, it will overwrite the old one. For example, if you bind F to clear decals, it will no longer be your default interact key unless you include it in the command like so: bind “f” “+use; r_cleardecals”.
The Legality and Impact: Is This Considered Cheating?
This is a critical question, and the answer is a resounding no. The r_cleardecals command is a legitimate part of the Source 2 engine’s console, provided by Valve itself for user customization. Using it via a bind is no different than changing your crosshair or adjusting video settings. It does not modify game files, read memory, or provide an unfair advantage outside of the game’s intended mechanics. It is universally accepted and used at all levels of play, from casual matchmaking to professional tournaments.
It’s a tool for optimization, much like adopting the sh1ro CS2 settings for a sharper visual setup or learning precise mirage callouts for better team communication.
Conclusion: A Clear Advantage Awaits
Mastering small optimizations like a decal clear bind is what separates good players from great ones. It’s a simple, legal, and effective way to ensure your game runs smoother and your screen remains free of visual obstructions. In a game where milliseconds and pixels determine the outcome of a duel, this tiny bit of control over your environment can make a significant difference.
Take two minutes now to implement this bind. Pair it with other performance tweaks, like exploring the b1t CS2 settings for inspiration or studying overpass callouts to sharpen your game sense. Every small advantage adds up to a much larger competitive edge.
Frequently Asked Questions (FAQs)
Q: Does clearing decals actually improve FPS in CS2?
A: The primary impact is on visual clarity, but it can improve FPS in specific scenarios. On lower-end PCs or during prolonged sessions where many decals have built up, executing the clear command can alleviate minor strain on the GPU and CPU, potentially recovering a few frames and reducing stutter.
Q: What is the best key to bind r_cleardecals to?
A: The “best” key is subjective and depends on your playstyle. Side mouse buttons (MOUSE4/MOUSE5) are highly recommended as they are easy to press without moving your fingers from movement keys. Other popular choices are F, C, V, or combining it with existing actions like reload (R) or jump (SPACE).
Q: Will I get banned for using a decal clear bind?
A: Absolutely not. This is a completely legitimate use of the game’s built-in console commands. It is not a cheat, exploit, or hack. It is a standard customization practiced by countless professional and amateur players alike.
Q: Do I need to use an autoexec.cfg file for this bind?
A: For a temporary bind that lasts only your current play session, no. However, to make the bind permanent so you don’t have to re-enter the command every time you launch CS2, you must place it in your autoexec.cfg configuration file.
Q: Can I bind it to clear decals on multiple keys?
A: Yes, you can bind the r_cleardecals command to as many keys as you like. There is no limit or conflict from having the same command on multiple binds. Many players have it on both a dedicated key and combined with another action, like reload.