



























































































Looking to copy the setup of one of Poland’s most iconic riflers? This complete Snax CS2 settings breakdown covers his crosshair, mouse sensitivity, viewmodel, video config, and hardware — everything you need to mirror the veteran’s in-game feel.
Janusz “Snax” Pogorzelski has been a fixture in professional Counter-Strike for over a decade, first rising to fame as part of the legendary Virtus.pro lineup. His config has been refined over thousands of hours, and it’s a rock-solid starting point for any player who wants proven, low-distraction settings.

Snax Mouse & Sensitivity Settings
Snax runs a low-to-medium sensitivity that favors precision spraying and controlled AK bursts over flick-heavy AWP play. If you’re a rifler working on your recoil control, these numbers are a great template.
| Setting | Value |
| DPI | 400 |
| In-Game Sensitivity | 1.8 |
| eDPI | 720 |
| Zoom Sensitivity | 0.93 |
| Windows Sensitivity | 6 |
| Mouse Acceleration | Off |
| Raw Input | On |
| Polling Rate | 4000 Hz |
Key takeaway: With an eDPI around 720, Snax sits firmly in the pro rifler sweet spot. If you’re spraying the AK-47 skin prices at long range and struggling with micro-adjustments, this range is worth testing.
Snax CS2 Crosshair Settings
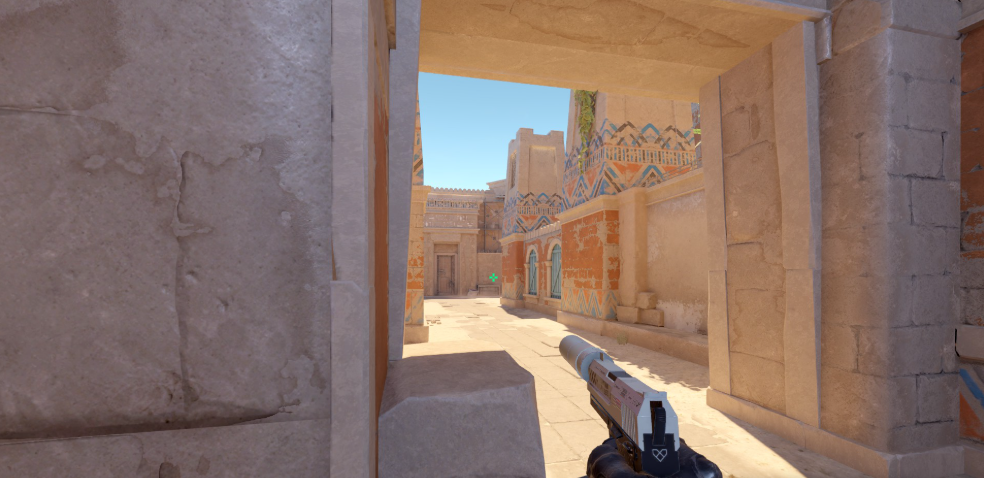
Snax uses a small, static green crosshair with no dot — clean, minimal, and easy to track against most map backgrounds.
| Setting | Value |
| Style | 4 (Static) |
| Color | Green (0, 255, 0) |
| Size | 1.5 |
| Thickness | 0.5 |
| Gap | -3 |
| Outline | 0 |
| Center Dot | Off |
| Alpha | 255 |
Copy Snax’s Crosshair Command
Paste this into your console to instantly load his crosshair:
cl_crosshairstyle 4; cl_crosshaircolor 5; cl_crosshaircolor_r 0; cl_crosshaircolor_g 255; cl_crosshaircolor_b 0; cl_crosshairsize 1.5; cl_crosshairthickness 0.5; cl_crosshairgap -3; cl_crosshair_drawoutline 0; cl_crosshairdot 0; cl_crosshairalpha 255Snax Viewmodel Settings
Snax keeps his viewmodel pushed to the right and low — a classic pro setup that maximizes screen real estate and keeps the weapon out of his crosshair’s path.
| Setting | Value |
| viewmodel_fov | 68 |
| viewmodel_offset_x | 2.5 |
| viewmodel_offset_y | 0 |
| viewmodel_offset_z | -1.5 |
| viewmodel_presetpos | 2 |
| cl_bob_lower_amt | 5 |
| cl_bobamt_lat | 0.33 |
| cl_bobamt_vert | 0.14 |
| cl_bobcycle | 0.98 |
If you’re new to tuning these values, check our cs2 graphic settings guide for a full breakdown of what each command actually does.
Snax Video & Graphics Settings
Like most pros, Snax runs a stretched-friendly, low-graphics config built for maximum FPS and clean player models. Frame consistency matters more than eye candy.
Resolution & Display
| Setting | Value |
| Resolution | 1280 × 960 |
| Aspect Ratio | 4:3 |
| Scaling Mode | Stretched |
| Display Mode | Fullscreen |
| Refresh Rate | 240 Hz |
Advanced Video Settings
| Setting | Value |
| Boost Player Contrast | Enabled |
| Wait for Vertical Sync | Disabled |
| Multisampling Anti-Aliasing | 4x MSAA |
| Global Shadow Quality | High |
| Model / Texture Detail | Low |
| Texture Filtering Mode | Bilinear |
| Shader Detail | Low |
| Particle Detail | Low |
| Ambient Occlusion | Disabled |
| High Dynamic Range | Quality |
| FidelityFX Super Resolution | Disabled (Highest Quality) |
| NVIDIA Reflex Low Latency | Enabled |
Pro tip: Shadows on High is a deliberate choice — it lets you spot enemy shadow cues on maps like Mirage and Inferno.
Snax Launch Options
Snax runs a simple set of CS2 launch options focused on performance:
-novid -freq 240 -refresh 240 -tickrate 128Add these via Steam → right-click CS2 → Properties → Launch Options.
Snax Gaming Gear & Hardware
His peripherals are competition-standard, built for consistency across LAN events.
| Gear | Model |
| Mouse | ZOWIE FK2-DW Black |
| Mousepad | ZOWIE G-SR-SE Bi II |
| Keyboard | Wooting 80HE Ghost |
| Headset | HyperX Cloud III Wireless Black |
| Monitor | ZOWIE XL2586X+ (600Hz) |
Summary: Upgrading to a high-refresh-rate display (like 240 Hz+ or 600 Hz) paired with a precise 4000 Hz polling rate mouse is the current tier-1 standard for competitive CS2.
How to Apply Snax’s Config Yourself
- Open CS2 and go to Settings.
- Set your resolution to 1280×960 stretched (or use your native resolution if you prefer).
- Match his sensitivity — 400 DPI, 2.2 in-game.
- Paste his crosshair command into the developer console (enable it under Game Settings first).
- Set his viewmodel commands through the console or via
viewmodel_presetpos 3. - Copy his launch options in Steam.
Give the setup at least a week before deciding whether it works — muscle memory takes time to reset.
Why Snax’s Setup Works
Snax’s config isn’t flashy. It’s battle-tested by over a decade of pro play, and every value serves a purpose:
- Low eDPI → precise spray transfers and clean pixel-level aim.
- Small green crosshair → visible on nearly every surface without visual clutter.
- Stretched 4:3 → wider player models and a more familiar CS legacy feel.
- Low graphics + high shadows → maximum FPS while retaining tactical info.
If you like this style, compare it against other Eastern European pros — our karrigan cs2 settings breakdown and w0nderful cs2 settings guide offer great side-by-side references.
Final Thoughts
Copying Snax’s config gives you a reliable, veteran-approved baseline — but the real work is in the reps. Nail the fundamentals, tweak the sensitivity to your arm, and use his crosshair as a starting point rather than gospel.
Want more pro configs? Explore our full library of pro player breakdowns, including tarik cs2 settings and broky cs2 settings — and check out the latest cs2 skins to complete your loadout.