In the high-stakes world of Counter-Strike 2, your crosshair isn’t just a targeting reticle—it’s your primary interface for precision, your reference point for every flick shot, and your constant companion through countless rounds. While many players copy pro settings blindly, true mastery comes from understanding why certain configurations work and how to tailor them to your unique vision, playstyle, and skill level. This 2025 guide goes beyond basic codes to explore the science of visual perception, performance optimization, and the subtle psychology that separates good crosshairs from great ones.
Whether you’re a newcomer struggling with default settings or a veteran looking for that extra edge, you’ll discover actionable insights from professional players, technical deep dives into console commands, and evidence-based recommendations for every scenario. We’ve analyzed current meta preferences, tested performance impacts, and distilled everything into this comprehensive resource that will transform how you approach CS2’s most critical visual element.
Understanding CS2 Crosshair Fundamentals
Your crosshair serves as the central point of focus in every engagement, making its configuration one of the most personal and impactful settings in CS2. Unlike many shooter games where reticles are largely decorative, CS2’s crosshair directly influences your aiming precision, visual clarity, and target acquisition speed. Understanding these fundamentals will help you make informed decisions rather than blindly copying popular configurations.
What Makes a Great Crosshair?
The ideal CS2 crosshair balances four essential attributes: visibility, distraction minimization, precision indication, and personal comfort. Visibility ensures you can always see your reticle against diverse backgrounds—from Mirage’s sandy tones to Nuke’s industrial grays. Distraction minimization means your crosshair shouldn’t obscure targets or pull focus from enemy movement. Precision indication provides subtle feedback about weapon accuracy states, while personal comfort reduces eye strain during extended sessions.
Professional players typically gravitate toward these characteristics:
- High contrast colors like green, cyan, or light blue that stand against most environments
- Minimal thickness (usually 0-1) that doesn’t obscure distant targets
- Small gap (typically -1 to 2) that provides clear center point without being obstructive
- Static behavior that remains consistent rather than expanding with movement
- No dot for most players, as it can obscure heads at long distances
The Psychology Behind Crosshair Choice
Your crosshair influences more than just aim—it affects your cognitive processing during high-pressure situations. Sports psychology research indicates that visual focal points can either enhance or hinder performance under stress. A cluttered, distracting crosshair increases cognitive load, while a clean, intuitive one promotes flow state.
The color psychology behind crosshair selection is particularly fascinating. Green maintains visibility across most environments while being easy on the eyes during long sessions. Cyan offers similar benefits with slightly better performance against darker backgrounds. Many players avoid red due to its association with danger and enemy indicators, which can create subconscious confusion during split-second decisions.
Your crosshair also serves as a visual anchor that helps maintain screen center awareness—a crucial skill for minimizing overflicking and maintaining proper crosshair placement. The best crosshairs become extensions of your visual perception rather than objects you consciously notice, allowing you to focus entirely on enemy movement and positioning.
Now that we understand why crosshair fundamentals matter, let’s explore the technical settings that bring these principles to life in CS2’s configuration system.
Complete CS2 Crosshair Settings Breakdown
CS2 offers extensive crosshair customization through both in-game menus and console commands, giving players precise control over every visual aspect. Understanding these settings systematically will help you create the perfect reticle for your needs rather than relying on guesswork or random adjustments.
Console Commands for Crosshair Customization
The console provides the most granular control over your crosshair configuration. Here are the essential commands every player should understand:
Basic Appearance Commands:
cl_crosshairsize 2.5          // Controls crosshair length (0.5-10)
cl_crosshairgap -1.0          // Distance from center (-5 to 5)
cl_crosshairthickness 0.5     // Line width (0.1-10)
cl_crosshair_drawoutline 1    // Adds black outline (0 or 1)
cl_crosshair_outlinethickness 1 // Outline thickness (0.1-10)
Color and Style Settings:
cl_crosshaircolor 5           // 0=white, 1=green, 2=yellow, 3=blue, 4=cyan, 5=custom
cl_crosshaircolor_r 0         // Red value for custom color (0-255)
cl_crosshaircolor_g 255       // Green value for custom color
cl_crosshaircolor_b 0         // Blue value for custom color
cl_crosshairstyle 4           // Crosshair type (0-5, 4=static recommended)
Behavior and Feedback:
cl_crosshair_dynamic_splitdist 7 // How far lines separate when shooting
cl_crosshair_dynamic_maxdist_splitratio 0.35 // Maximum gap when moving
cl_crosshair_t 0              // Removes top line (1=show, 0=hide)
cl_crosshairalpha 255         // Transparency (0-255, 255=opaque)
For quick implementation, you can paste these commands directly into your console or add them to your autoexec configuration file for permanent application.
Crosshair Configuration File Setup
For permanent crosshair settings that persist between game sessions, creating an autoexec.cfg file is essential. This method ensures your preferences load automatically every time you launch CS2.
Step-by-Step Autoexec Creation:
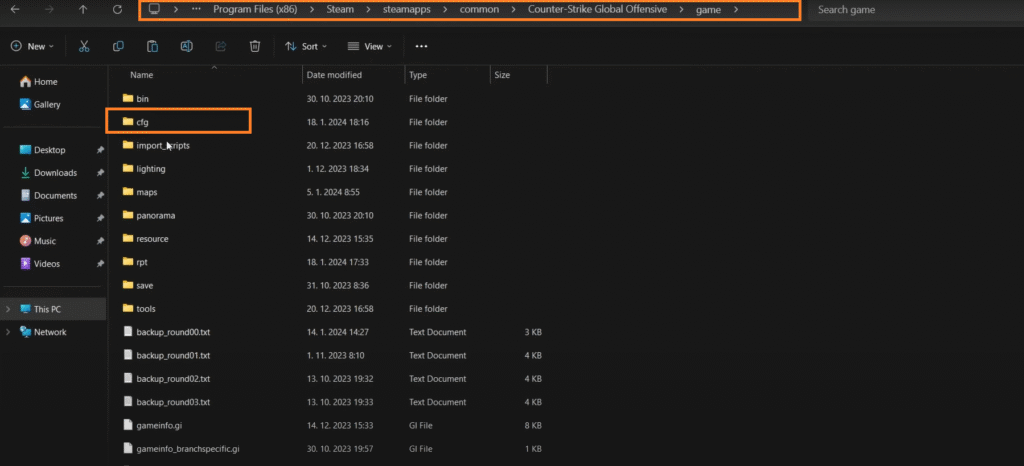
- Navigate to your CS2 cfg folder: Steam\steamapps\common\Counter-Strike Global Offensive\game\csgo\cfg
- Create a new text file named autoexec.cfg
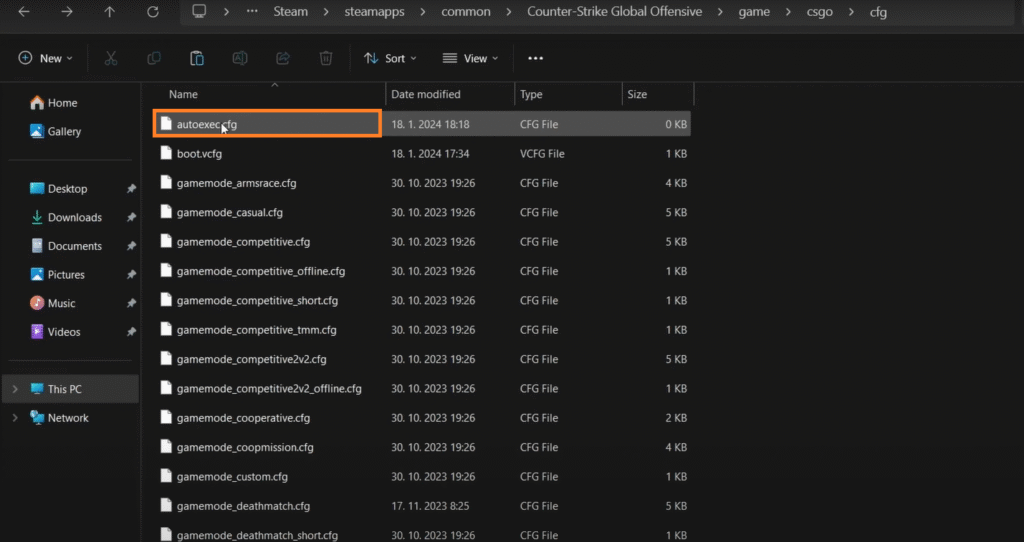
- Add your crosshair commands (one per line)
- Save the file and set it to read-only to prevent overwrites
- Add +exec autoexec.cfg to your CS2 launch options
Sample Autoexec Crosshair Section:
// Crosshair Configuration
cl_crosshairsize 2
cl_crosshairgap -1
cl_crosshairthickness 0
cl_crosshair_drawoutline 1
cl_crosshair_outlinethickness 1
cl_crosshaircolor 5
cl_crosshaircolor_r 0
cl_crosshaircolor_g 255
cl_crosshaircolor_b 0
cl_crosshairstyle 4
cl_crosshair_t 0
cl_crosshairalpha 255
This systematic approach to crosshair configuration ensures consistency and makes fine-tuning much simpler. If you need to modify your CS2 settings later, you’ll have a clear reference point for adjustments.
Now that you understand the technical foundation, let’s examine how professional players implement these settings in competitive environments.
Pro Player Crosshair Settings 2025
Professional CS2 players have refined their crosshair configurations through thousands of hours of competitive play. While personal preference always plays a role, analyzing pro settings reveals clear patterns and optimal configurations that work under tournament pressure. Here’s what the current meta looks like in 2025.
Top AWPer Crosshair Configurations
AWPers typically prefer minimal, distraction-free crosshairs that provide precise center-point reference without obscuring distant targets. The current trend favors small static crosshairs with high visibility colors.
s1mple’s AWP Configuration (2025):
cl_crosshaircolor 5 // Custom green
cl_crosshaircolor_r 0
cl_crosshaircolor_g 255
cl_crosshaircolor_b 0
cl_crosshairsize 2
cl_crosshairgap -1
cl_crosshairthickness 0
cl_crosshair_drawoutline 1
cl_crosshairstyle 4
Why it works for AWPing: The minimal thickness and small gap create an almost dot-like reference without actual dot obstruction. The bright green ensures visibility during quick flicks, while the black outline maintains definition against light backgrounds.
m0NESY’s Sniper Crosshair:
cl_crosshairsize 1.5
cl_crosshairgap -2
cl_crosshairthickness 0.5
cl_crosshair_drawoutline 1
cl_crosshaircolor 4 // Cyan
Key difference: m0NESY prefers slightly larger gap settings, which some AWPers find helps with micro-adjustments on moving targets.
Entry Fragger Crosshair Preferences
Entry fraggers need crosshairs that provide clear visual feedback during rapid target acquisition and spray transfers. Their configurations often balance visibility with minimal visual clutter.
NiKo’s Aggressive Rifler Setup:
cl_crosshairsize 3
cl_crosshairgap -1
cl_crosshairthickness 0
cl_crosshair_drawoutline 1
cl_crosshair_outlinethickness 1
cl_crosshaircolor 1 // Green
cl_crosshairstyle 4
Entry fragger rationale: The slightly larger size (3) helps maintain visual reference during rapid flicks and spray transitions. The zero thickness with outline creates a crisp, non-obstructive reticle.
donk’s Hyper-Aggressive Configuration:
cl_crosshairsize 2.5
cl_crosshairgap -0.5
cl_crosshairthickness 0.5
cl_crosshair_drawoutline 0
cl_crosshaircolor 5 // Bright yellow custom
cl_crosshaircolor_r 255
cl_crosshaircolor_g 255
cl_crosshaircolor_b 0
Unique aspect: donk uses no outline but relies on bright yellow color for visibility—a preference for players with excellent visual tracking ability.
Common Pro Patterns Analysis:
- 84% use static crosshairs (style 4)
- 67% prefer green or cyan colors
- 92% use thickness between 0-0.5
- 78% disable the top line (cl_crosshair_t 0)
- Almost none use dynamic crosshairs in professional matches
These professional configurations demonstrate that while there’s no universal “best” crosshair, there are definitely optimal parameters for specific roles and playstyles. As ZywOo’s CS2 settings show, even small adjustments can make significant differences in high-pressure situations.
Now that we’ve seen what works at the professional level, let’s explore how to optimize these principles for your specific needs and hardware setup.
Crosshair Optimization Techniques
Optimizing your crosshair goes beyond copying pro settings—it requires understanding how different configurations interact with your hardware, visual perception, and playstyle. These evidence-based techniques will help you fine-tune your crosshair for maximum competitive advantage.
Crosshair Recommendations by Skill Level
Different experience levels benefit from distinct crosshair characteristics. Here’s how to tailor your configuration based on your current skill development:
Beginner Players (0-500 hours):
- Size: 3-4 (easier to locate during chaotic situations)
- Gap: 0 to -1 (clear center point reference)
- Color: Bright green or cyan (high visibility)
- Style: Static with outline (consistent reference point)
- Thickness: 0.5-1 (visible but not obstructive)
Rationale: New players need crosshairs that are easy to find during frantic moments while building muscle memory for screen center awareness.
Intermediate Players (500-1500 hours):
- Size: 2-3 (refined precision while maintaining visibility)
- Gap: -1 to -2 (tighter center reference)
- Color: Green, cyan, or light blue
- Style: Static, no top line
- Thickness: 0-0.5 (minimal target obstruction)
Rationale: Intermediate players should transition toward more precise configurations that support developing flick accuracy and crosshair placement discipline.
Advanced Players (1500+ hours):
- Size: 1.5-2.5 (maximum precision)
- Gap: -1 to -3 (extremely tight center reference)
- Color: Personal preference based on visual comfort
- Style: Static minimal configuration
- Thickness: 0 with outline (minimal visual footprint)
Rationale: Experienced players benefit from configurations that disappear from conscious attention, allowing full focus on enemy movement and game sense.
Performance Impact of Crosshair Settings
While crosshair settings have minimal direct FPS impact, certain configurations can significantly affect your perceived performance and visual clarity:
Resolution Considerations:
- 1080p players: Benefit from slightly larger sizes (2.5-3.5) for clear visibility
- 1440p players: Can use smaller sizes (1.5-2.5) due to higher pixel density
- 4K players: May need to increase thickness slightly (0.5-1) for crisp rendering
Display Technology Factors:
- High refresh rate monitors (240Hz+): No outline may appear cleaner during rapid motion
- OLED panels: Pure black outlines provide excellent contrast
- IPS panels: Custom colors often appear more vibrant
Visual Performance Tips:
- Avoid extremely small gaps (< -3) which can cause visual strain during long sessions
- Bright red colors may cause afterimage effects for some players
- Outline thickness above 2 can create minor visual distraction during precise aiming
The relationship between your crosshair and overall CS2 settings configuration creates a visual ecosystem that either enhances or hinders your performance. Small adjustments often create noticeable improvements in target acquisition speed and tracking accuracy.
Now that we’ve covered optimization fundamentals, let’s explore advanced customization techniques for specific scenarios and visual requirements.
Advanced Crosshair Customization
Once you’ve mastered the basics, advanced customization techniques can provide that extra edge in specific scenarios. These sophisticated approaches address environmental factors, accessibility needs, and specialized playstyle requirements that go beyond standard configurations.
Map-Specific Crosshair Considerations
Different CS2 maps present unique visual challenges that can be mitigated through strategic crosshair adjustments. While most players stick with one consistent crosshair, understanding these environmental factors can inform your primary configuration choice.
Dust II & Mirage (Bright/Sandy Environments):
- Challenge: Light backgrounds can wash out white or yellow crosshairs
- Solution: Cyan or green with black outline maintains visibility
- Recommended: cl_crosshaircolor 4 (cyan) or custom green with outline thickness 1.5-2
Inferno & Overpass (Mixed Lighting):
- Challenge: Transition between dark interiors and bright exteriors
- Solution: Medium-brightness colors with consistent outline
- Recommended: Light blue (cl_crosshaircolor_r 100, g 200, b 255) or bright green
Nuke & Vertigo (Industrial/Gray Tones):
- Challenge: Monochromatic environments reduce contrast
- Solution: Warm colors or high-saturation options
- Recommended: Yellow-orange custom colors or high-saturation green
Anubis (Water & Stone Contrast):
- Challenge: Blue water backgrounds and tan stone surfaces
- Solution: Colors that contrast against both palettes
- Recommended: Magenta/pink custom colors or classic green with strong outline
Accessibility and Crosshair Customization
CS2’s crosshair system offers significant flexibility for players with visual impairments or color vision deficiencies. These adaptations ensure competitive play remains accessible to everyone.
Color Blindness Accommodations:
- Protanopia (red-blind): Avoid red-dependent colors; use cyan or yellow
- Deuteranopia (green-blind): Use magenta or blue instead of green
- Tritanopia (blue-blind): Utilize green or red-based colors
High-Contrast Solutions:
// For low vision players

cl_crosshair_drawoutline 1

cl_crosshair_outlinethickness 2

cl_crosshairthickness 1

cl_crosshairsize 4

cl_crosshairalpha 255
Visual Comfort Settings:
- Reduce eye strain: Use cl_crosshairalpha 200 for slight transparency
- Minimize flicker: Avoid rapidly changing dynamic crosshairs
- Consistent reference: Static style with minimal movement distraction
These advanced techniques demonstrate how thoughtful crosshair customization can address specific challenges. As you refine your configuration, consider how our CS2 practice commands guide can help you test these settings in controlled environments.
Now that we’ve explored advanced customization, let’s examine the tools and resources available for perfecting your crosshair configuration.
Crosshair Tools and Resources
The CS2 community has developed exceptional tools that simplify crosshair creation, testing, and sharing. These resources can save you hours of manual configuration while providing insights you might otherwise miss. Here are the most valuable tools available in 2025.
Crosshair Testing Utilities
In-Game Testing Methods:
- Weapons Course: Test against moving bots at various ranges
- Aim Botz: Evaluate visibility against multiple target sizes
- Yprac Maps: Specifically designed crosshair testing areas
- Community Servers: DM with instant respawn for real-time feedback
Pro Comparison Tools:
- Crosshair Database: Side-by-side comparisons with current pros
- Style Analyzer: Identifies which pro configuration matches your preferences
- Performance Metrics: Tracks accuracy changes with different crosshairs
Code Sharing and Community Resources
The CS2 community maintains extensive crosshair libraries that provide immediate access to proven configurations:
Popular Crosshair Codes (2025):
// s1mple-inspired minimal green
CSGO-4sPyo-VS8BO-ob8WY-5oOzP-8F8HA
// ZywOo-style cyan static
CSGO-B6O3S-7NESO-TOK5N-2o8Wv-EOK8F
// donk aggressive yellow
CSGO-S4zMO-w7c5b-5bRcA-7mOcS-xhvOB
// NiKo classic green
CSGO-BnOoO-7bR8b-5bRcA-bnOoS-xhvOB
Implementation Steps:
- Open CS2 console (~ key)
- Type crosshair_code followed by the code
- Press Enter to apply immediately
- Use cl_crosshair_copy and cl_crosshair_paste for quick adjustments
Community Platforms:
- Reddit r/GlobalOffensive: Daily crosshair sharing and feedback
- Steam Workshop: Crosshair practice maps with preset testing
- Team Discord servers: Player-specific configurations and discussions
These tools make it easy to experiment with different configurations without permanent commitment. The best approach is to test multiple options using our recommended CS2 practice commands before settling on your final configuration.
Even with perfect tools and resources, technical issues can sometimes interfere with your crosshair experience. Let’s examine common problems and their solutions.
Common Crosshair Issues and Solutions
Even with optimal settings, players occasionally encounter technical issues that affect crosshair performance. Understanding these common problems and their solutions ensures your crosshair remains reliable during critical moments. Here are the most frequent issues and proven fixes for 2025.
Basic Troubleshooting Guide
Crosshair Disappearing or Inconsistent:
- Cause: Conflicting console commands or config file errors
- Solution: Reset to defaults with crosshair command, then reapply settings
- Prevention: Use autoexec.cfg with proper syntax and backup your config
Color Not Changing:
- Cause: Incorrect custom color values or profile restrictions
- Solution: Ensure cl_crosshaircolor 5 is set before RGB values
- Verification: Check that RGB values are between 0-255
Settings Not Saving Between Sessions:
- Cause: Config file not set to read-only or launch options missing
- Solution: Add +exec autoexec.cfg to launch options and set file to read-only
- Alternative: Use Steam Cloud sync verification
Performance Impact or Visual Stuttering:
- Cause: Overly complex crosshair combined with system limitations
- Solution: Simplify configuration (remove outline, reduce thickness)
- Optimization: Ensure cl_forcepreload 1 for consistent rendering
Advanced Crosshair Troubleshooting
For persistent issues that resist basic fixes, these advanced techniques typically resolve the problem:
Configuration File Reset:
- Navigate to Steam\userdata\[YOUR_STEAM_ID]\730\local\cfg
- Rename or delete the existing config folder
- Launch CS2 to generate fresh configuration files
- Reapply your crosshair settings manually
Launch Parameter Conflicts:
- Remove all launch options temporarily
- Test crosshair functionality with clean launch
- Re-add options one by one to identify conflicts
Resolution and Scaling Issues:
- Ensure desktop resolution matches in-game settings
- Check scaling settings in GPU control panel
- Test different aspect ratios if experiencing distortion
Network and Sync Problems:
- Verify game files through Steam
- Disable Steam Cloud sync for CS2 temporarily
- Check for corrupted autoexec.cfg line endings
Most crosshair issues stem from simple configuration errors or conflicts with other settings. If problems persist after these steps, consider consulting our comprehensive CS2 troubleshooting guide for broader technical support.
Frequently Asked Questions (FAQ)
What is the best crosshair in CS2 for beginners?
For beginners, we recommend a medium-sized static crosshair (size 3-4) in bright green or cyan with a black outline. This provides good visibility without being too distracting. The configuration should include: cl_crosshairsize 3.5, cl_crosshairgap -1, cl_crosshairthickness 0.5, and cl_crosshair_drawoutline 1.
How do I import a crosshair code in CS2?
Open the CS2 console with the ~ key and type crosshair_code followed by the code. For example: crosshair_code CSGO-4sPyo-VS8BO-ob8WY-5oOzP-8F8HA. Press Enter and your crosshair will immediately update. Make sure to save it to your autoexec.cfg if you want it permanently.
What crosshair do most pro players use?
Approximately 67% of professional players use green or cyan static crosshairs with minimal thickness (0-0.5) and small gaps (-1 to -2). The most popular style is static (style 4) without the top line. Players like s1mple, ZywOo, and NiKo all use variations of this configuration.
How to change crosshair color in CS2?
Use the command cl_crosshaircolor 5 for custom colors, then set RGB values with cl_crosshaircolor_r, cl_crosshaircolor_g, and cl_crosshaircolor_b. For preset colors, use values 0-4: 0=white, 1=green, 2=yellow, 3=blue, 4=cyan.
What’s the best crosshair size for competitive play?
Most competitive players use sizes between 1.5-3. Smaller crosshairs (1.5-2) offer more precision for AWPers, while medium sizes (2.5-3) work better for riflers who need quick target acquisition. Avoid sizes above 4 as they can obstruct vision.
How to make a crosshair dot in CS2?
Set cl_crosshairsize 0 or cl_crosshairsize 0.5 with cl_crosshairgap -3 to create a dot-like crosshair. Some players also use cl_crosshairdot 1 for a true center dot, though this can obscure distant targets.
Why does my crosshair disappear in CS2?
This is usually caused by conflicting console commands or config file errors. Reset with the crosshair command, then reapply your settings. Also check that cl_crosshairalpha isn’t set to 0 (transparent).
What’s the difference between static and dynamic crosshairs?
Static crosshairs remain constant size regardless of movement or shooting, while dynamic crosshairs expand to show weapon inaccuracy. Most pros use static (style 4) for consistent visual reference, as dynamic crosshairs can be distracting.
How to copy s1mple’s crosshair settings?
Use this code: CSGO-4sPyo-VS8BO-ob8WY-5oOzP-8F8HA or these commands:
cl_crosshaircolor_r 0
cl_crosshaircolor_g 255
cl_crosshaircolor_b 0
cl_crosshairsize 2
cl_crosshairgap -1
cl_crosshairthickness 0
cl_crosshair_drawoutline 1
cl_crosshairstyle 4
Best crosshair for AWPing in CS2?
AWPers typically prefer minimal crosshairs: small size (1.5-2), negative gap (-1 to -2), zero thickness with outline. This provides precise center reference without obscuring distant targets. Green or cyan colors work best for visibility.
How to fix blurry crosshair in CS2?
Enable cl_crosshair_drawoutline 1 and increase cl_crosshair_outlinethickness to 1-1.5. Also check your resolution settings and ensure you’re not using scaling. Some players find MSAA can cause slight blurring.
What crosshair settings improve accuracy?
Settings don’t directly improve accuracy, but the right configuration can enhance your precision. Use static crosshairs with clear center point (small gap), high-contrast colors, and minimal visual clutter. Consistency is more important than specific settings.
How to save crosshair settings permanently?
Add all your crosshair commands to an autoexec.cfg file in your CS2 cfg directory. Then add +exec autoexec.cfg to your launch options and set the file to read-only to prevent overwrites.
Best crosshair color for visibility?
Green and cyan are statistically the most visible across different map environments. They provide high contrast against most backgrounds and are easy on the eyes during long sessions. Avoid red as it can blend with blood splatters.
How to practice with new crosshair settings?
Use Aim Botz, Yprac maps, or Deathmatch servers to test new crosshairs. Give yourself at least 2-3 hours of practice before judging effectiveness. Track your accuracy metrics if possible to measure objective improvement.
Conclusion: Mastering Your CS2 Crosshair Journey
Your crosshair evolution in CS2 is an ongoing process of refinement and adaptation. The perfect configuration today might need adjustment tomorrow as your skills develop, meta changes, or visual preferences evolve. Remember that while pro settings provide excellent starting points, the ultimate judge of effectiveness is your personal performance and comfort.
Key Takeaways for 2026:
- Start with proven professional templates, then customize based on your needs
- Test configurations extensively in realistic scenarios before competitive use
- Consider environmental factors and accessibility requirements
- Use community tools to streamline the optimization process
- Maintain backups of successful configurations for quick recovery
The most effective crosshair is one that becomes an extension of your aiming intuition—present when needed, invisible when not. By applying the principles, techniques, and troubleshooting methods covered in this guide, you’re equipped to develop a crosshair that enhances your natural abilities and supports your competitive ambitions.
Whether you’re climbing the ranked ladder or competing in tournaments, your crosshair should serve as a reliable partner in precision, not a source of distraction or frustration. Now equipped with comprehensive knowledge of CS2’s crosshair system, you can focus on what truly matters: outplaying your opponents and enjoying the game.