Dust 2 is one of the most iconic and balanced maps in Counter-Strike 2 (CS2). Its straightforward layout makes it a favorite among both new and seasoned players. Understanding the specific callouts on Dust 2 is essential for effective communication, strategic planning, and overall success in matches. This guide provides a comprehensive overview of all the crucial Dust 2 map callouts, including detailed sections on both bombsites and other key areas.
Understanding Dust 2 Map Callouts
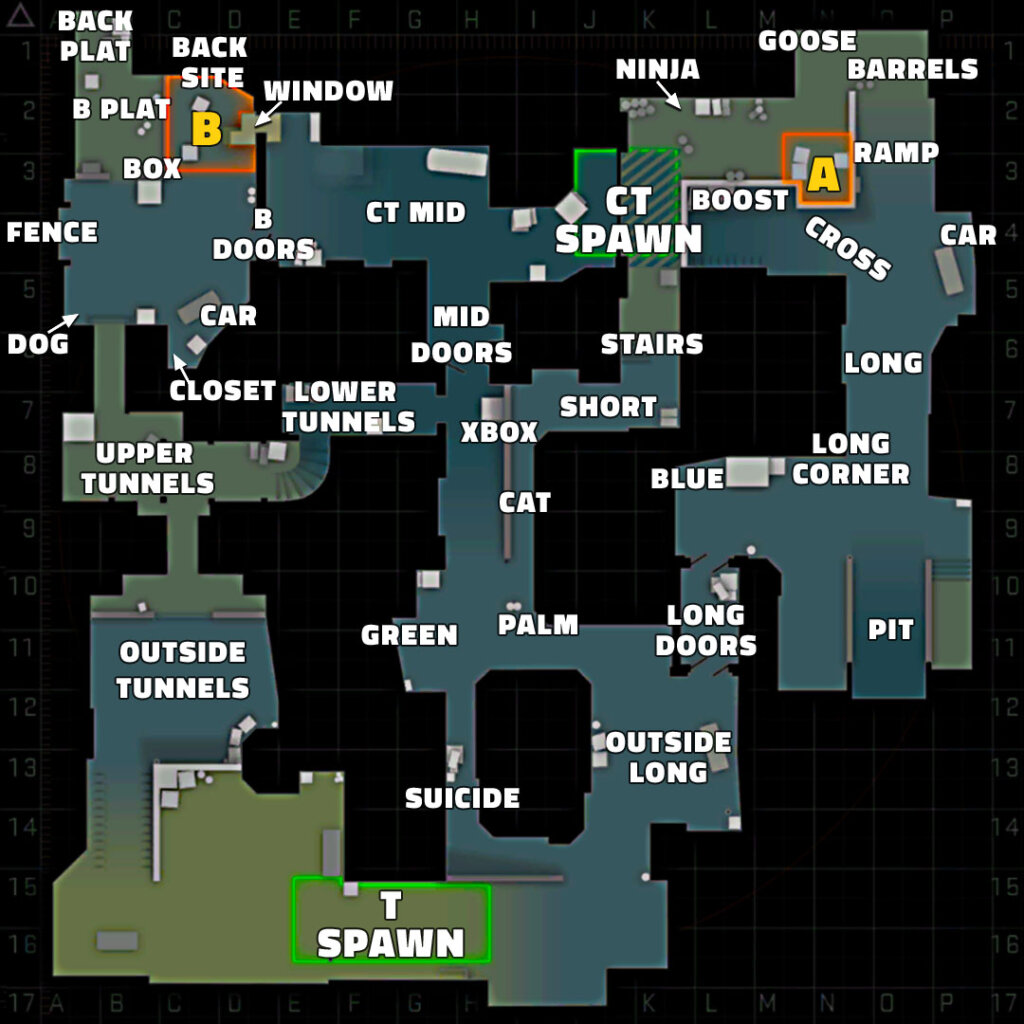
Callouts are specific names assigned to various locations on the map. They enable players to communicate enemy positions, coordinate strategies, and execute plays efficiently. Familiarity with these callouts is vital for teamwork and situational awareness.
Dust 2 A Site Callouts

The A site on Dust 2 offers multiple entry points and is a common focus for both attackers and defenders.
- A Site: The primary bomb planting area, located on the elevated platform.
- Goose: A corner spot behind A Site, ideal for defenders to surprise attackers coming from Short.
- A Ramp: The sloped path leading up from Long to A Site.
- A Long: The extended corridor from Long Doors to A Site, often contested at the start of rounds.
- Pit: A lower area along A Long, providing cover and a vantage point towards A Site.
- Car: A defensive position near A Long, behind a stationary vehicle.
- Short (Catwalk): A raised pathway connecting Mid to A Site, allowing for quick rotations and flanking.
- Elevator: A spot near CT Spawn, used by defenders to jump up to A Site during retakes.
- A Cross: The open area between A Long and A Site, often requiring smokes to cross safely.
- Barrels: A set of barrels near A Site, offering cover for defenders.
- Ninja: A hidden spot on A Site where defenders can attempt stealthy defuses.
Dust 2 B Site Callouts

The B site is more enclosed, requiring precise coordination and utility usage for successful attacks.
- B Site: The main bomb planting area, surrounded by various cover spots.
- B Plat (Platform): An elevated area at the back of B Site, offering a vantage point over Tunnels.
- Back Plat: The farthest corner of B Plat, commonly used by defenders to hold the site.
- B Car: A defensive position near the car on B Site, providing cover from Tunnels.
- Closet: A tight corner near B Car, often used for surprise plays.
- Big Box: A large box in the center of B Site, offering cover and obstructing lines of sight.
- Double Stack: Two stacked boxes near the default plant spot, used for cover and elevation.
- B Default Plant: The standard bomb planting location on B Site, situated near the wall.
- B Window: An opening in the wall connecting B Site to Mid, allowing for rotations and peeks.
- B Doors: Double doors connecting B Site to CT Mid, crucial for rotations and retakes.
- Fence: A fenced area near B Site, offering cover for defenders.
- Close: A corner near the Tunnels exit onto B Site, often checked for lurking defenders.
Furthermore you can learn about, Is Dust 2 CT or T sided in CS2.
Mid and Connector Callouts

Controlling Mid is essential for map dominance and flexible rotations.
- Mid: The central area of Dust 2, connecting both bombsites and offering multiple strategic options.
- Top Mid: The upper portion of Mid, near T Spawn, often used for initial engagements.
- Suicide: A risky path from T Spawn to Mid, exposed to sniper fire from CTs.
- Xbox: A box in Mid used to jump onto Catwalk, facilitating A Short pushes.
- CT Mid: The area between Mid Doors and CT Spawn, critical for rotations.
- Mid Doors: Double doors in Mid, a common spot for sniper duels and information gathering.
- Scaffolding: A structure near CT Mid, offering elevation and cover.
Tunnels and Spawn Callouts
These areas are vital for initiating attacks and controlling map flow.
- T Spawn: The starting point for Terrorists each round.
- T Plat (Platform): An elevated area near T Spawn, providing a vantage point over T Ramp.
- T Ramp: A ramp leading from T Spawn to Outside Tunnels.
- Outside Tunnels: The area just before entering B Tunnels from T Spawn.
- Upper Tunnels: The upper section of B Tunnels, leading directly to B Site.
- Lower Tunnels: The lower section of B Tunnels, connecting to Mid.
Tips for Mastering Dust 2 Callouts
- Practice Regularly: Familiarize yourself with each callout by playing the map frequently.
- Use Voice Communication: Communicate enemy positions and strategies using the correct callouts.
- Watch Professional Matches: Observe how professional players utilize callouts and positioning.
- Play with Friends: Coordinate with teammates to reinforce callout usage and map knowledge.
Conclusion
Mastering the Dust 2 callouts is a fundamental step towards improving your gameplay in CS2. By understanding each area’s name and strategic importance, you can enhance communication, execute strategies more effectively, and increase your chances of winning rounds. Whether you’re attacking the Dust 2 B Site or defending the Dust 2 A Site, precise callouts are key to success.